 GitKraken Desktop
 GitLens for IDEs
  GitKraken CLI
 GitKraken MCP
 GitKraken Insights
 Git Integration for Jira
 Supercharge Your Dev Team
  Secure Your Dev Team
 Jira is a project management tool that is widely used by developers to track and manage software development projects. It is a platform revolving around organizing, prioritizing and tracking the progress of tasks and bugs, as well as for collaborating with team members and stakeholders.
AWS CodeCommit is a version control and code repository service that allows developers to store and manage their code in a secure and scalable way. It provides features such as versioning, branch management, and pull request workflows, making it easier for teams to work together on code development. AWS CodeCommit has some great features that make it an enticing choice for repository hosting. With it’s integration with AWS Identity and Access Management (IAM) features, security and access control is a breeze. Since AWS is fully managed, this eliminates the overhead of maintaining your own source control servers, and automatically scalable.
Integrating AWS CodeCommit with Jira
Connect AWS CodeCommit with Jira
Linking AWS CodeCommit with Jira Issues
Create AWS CodeCommit Branch in Jira
Create AWS CodeCommit Pull Request in Jira
Jira AWS CodeCommit Integration Benefits
Integrating AWS CodeCommit and Jira using Git Integration for Jira offers unique advantages for the entire development team.
Top Benefits For Developers
- Seamless Workflow: using an AWS CodeCommit Jira integration enables developers to streamline their daily workflow by keeping track of their code changes and project tasks within Jira. This eliminates the need for constant context switching between multiple tools, saving time and improving productivity.
- Improved Visibility and Collaboration: by integrating Jira and AWS CodeCommit, developers can keep their team members and stakeholders updated on the progress of their projects and code changes in real-time. This improves collaboration, transparency, and helps ensure that everyone is on the same page, reducing the risk of misunderstandings and delays.
Top Benefits For Project and Product Managers
- Real-time Project Progress: integrating Jira with AWS CodeCommit gives project managers a real-time view of the progress of major projects, including code changes and development tasks. This allows them to make informed decisions, track project progress, and identify potential roadblocks before they become major issues.
- Better Team Collaboration and Insights: this integration provides project managers with detailed insights into the contributions of each team member, making it easier to manage resources and allocate tasks more effectively.
Connect AWS CodeCommit with Jira
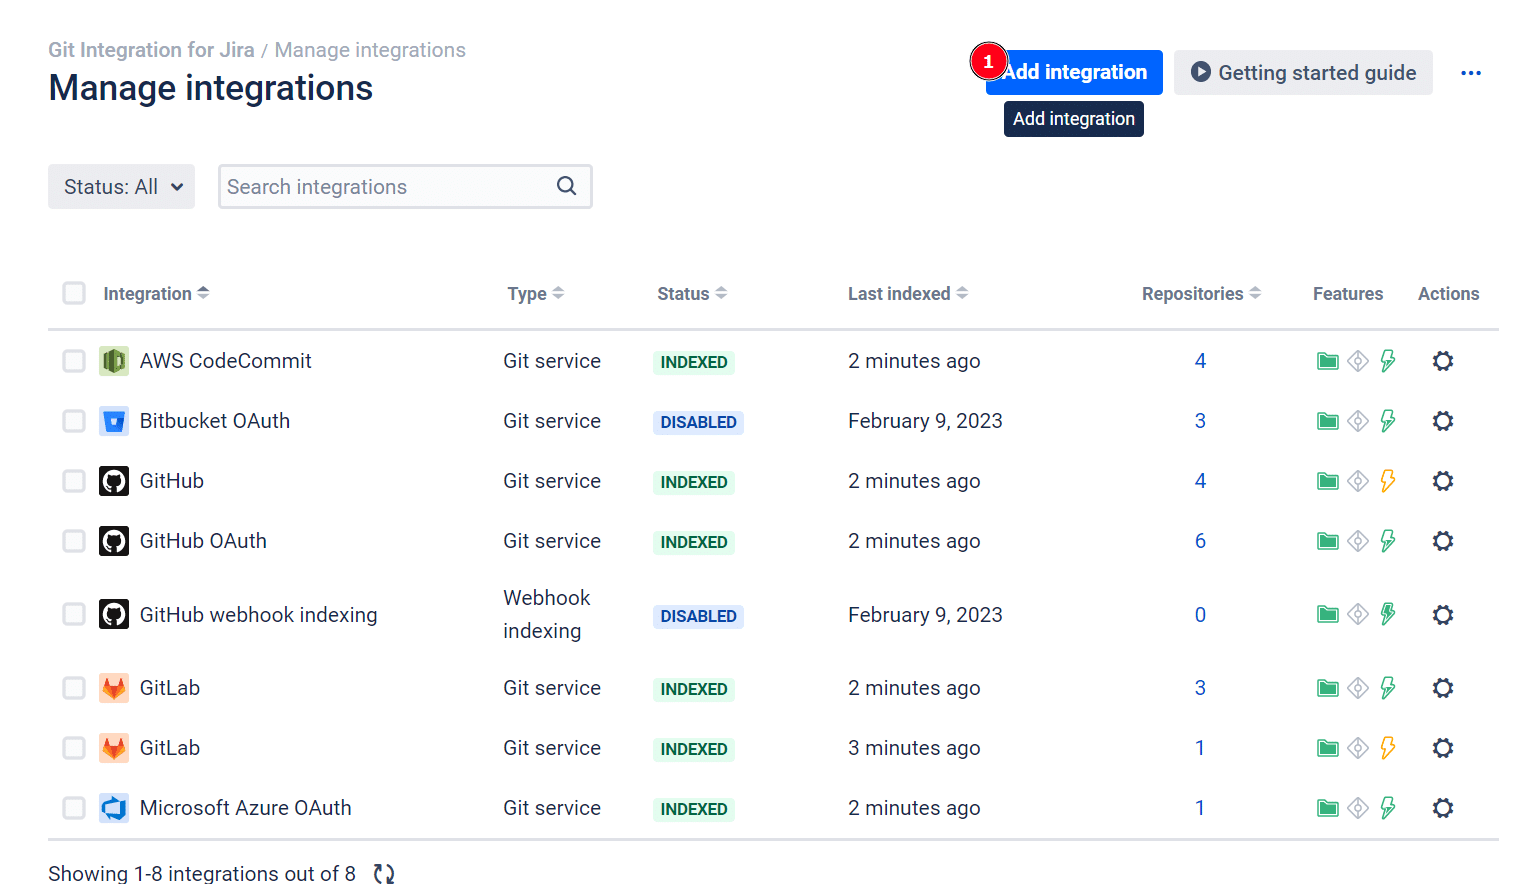
- On the Jira Cloud dashboard menu, go to Apps ➜ Git Integration: Manage integrations.
- On the Manage integrations page, click Add integration.
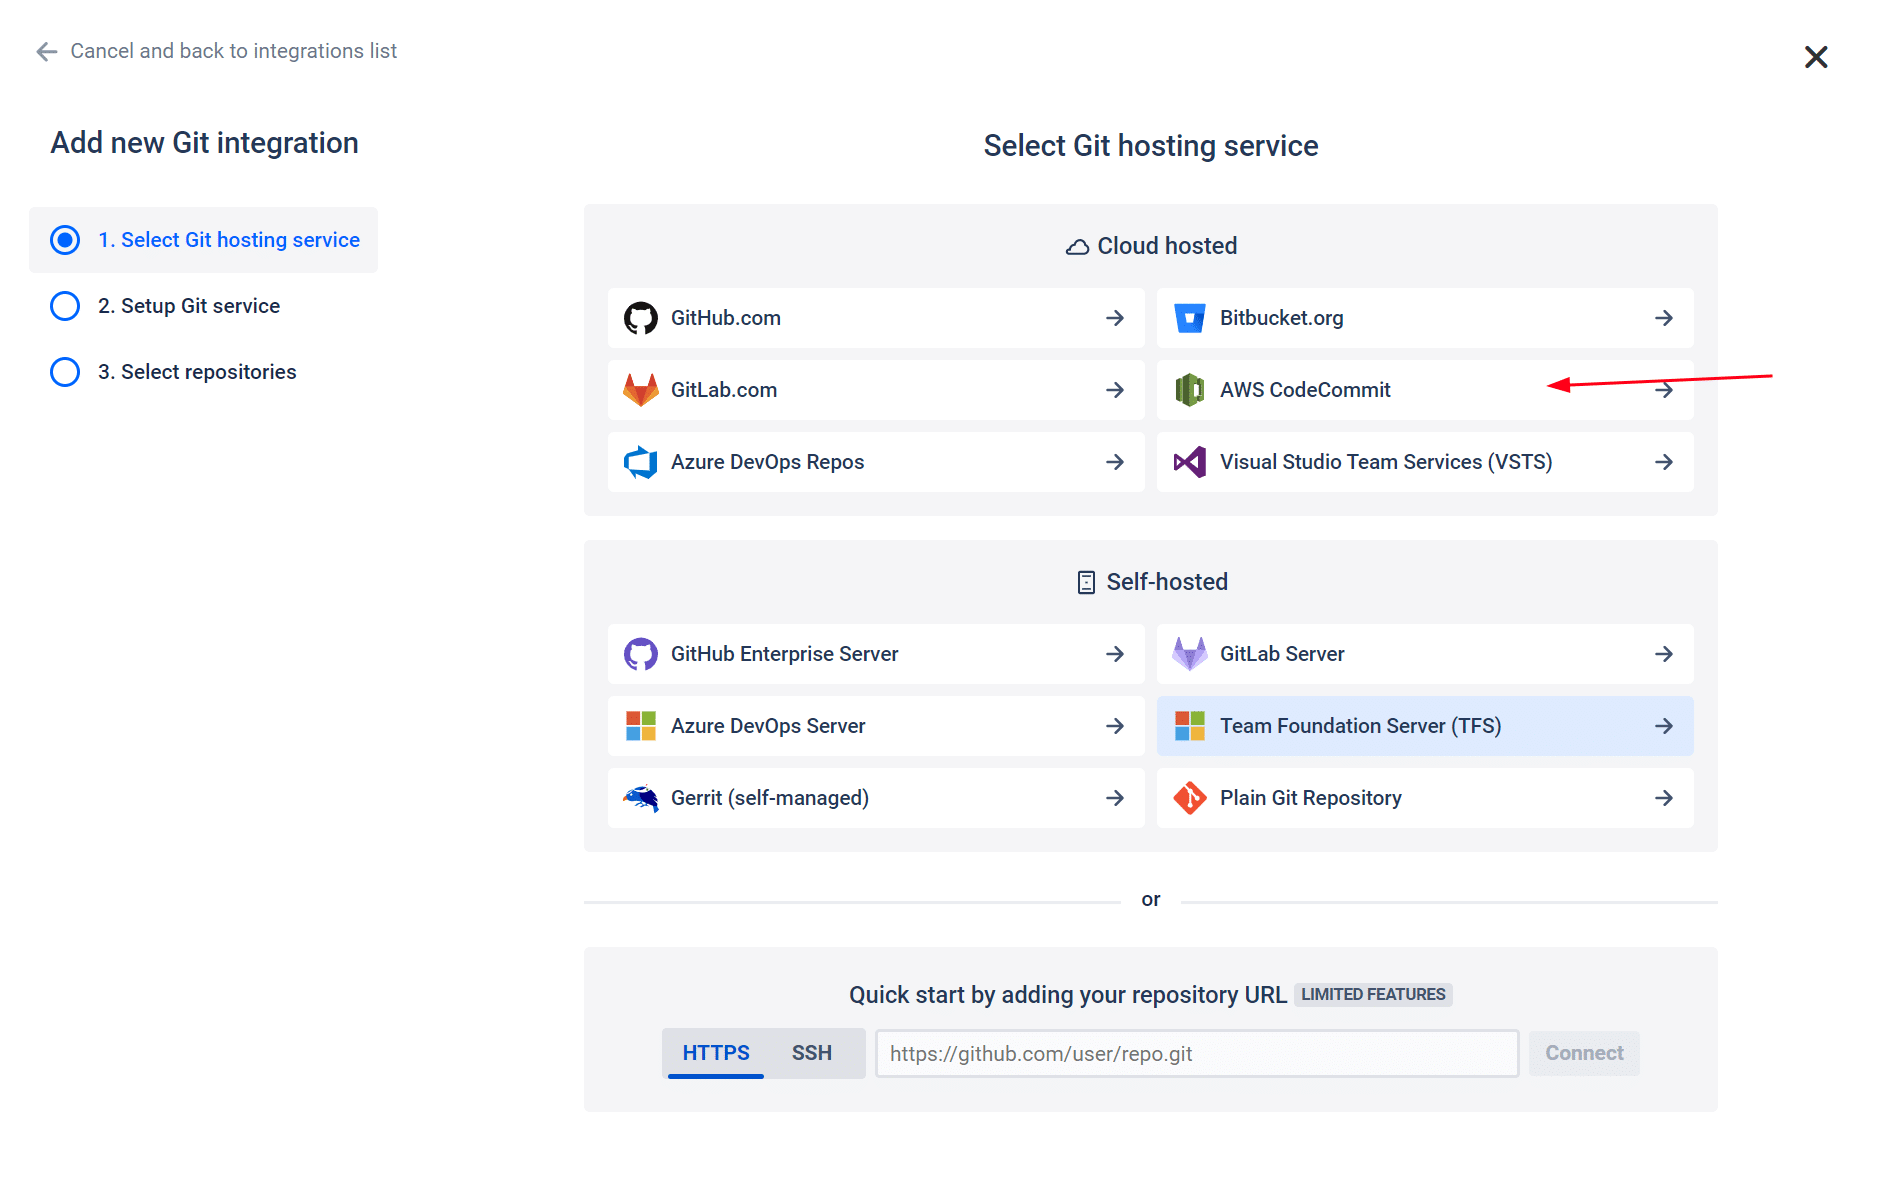
- For the following screen, click AWS CodeCommit to start integration with this Git service.
- On the following screen, proceed to enter information on the provided field boxes.
- Enter the Access key ID and the Secret Access Key in their respective fields.
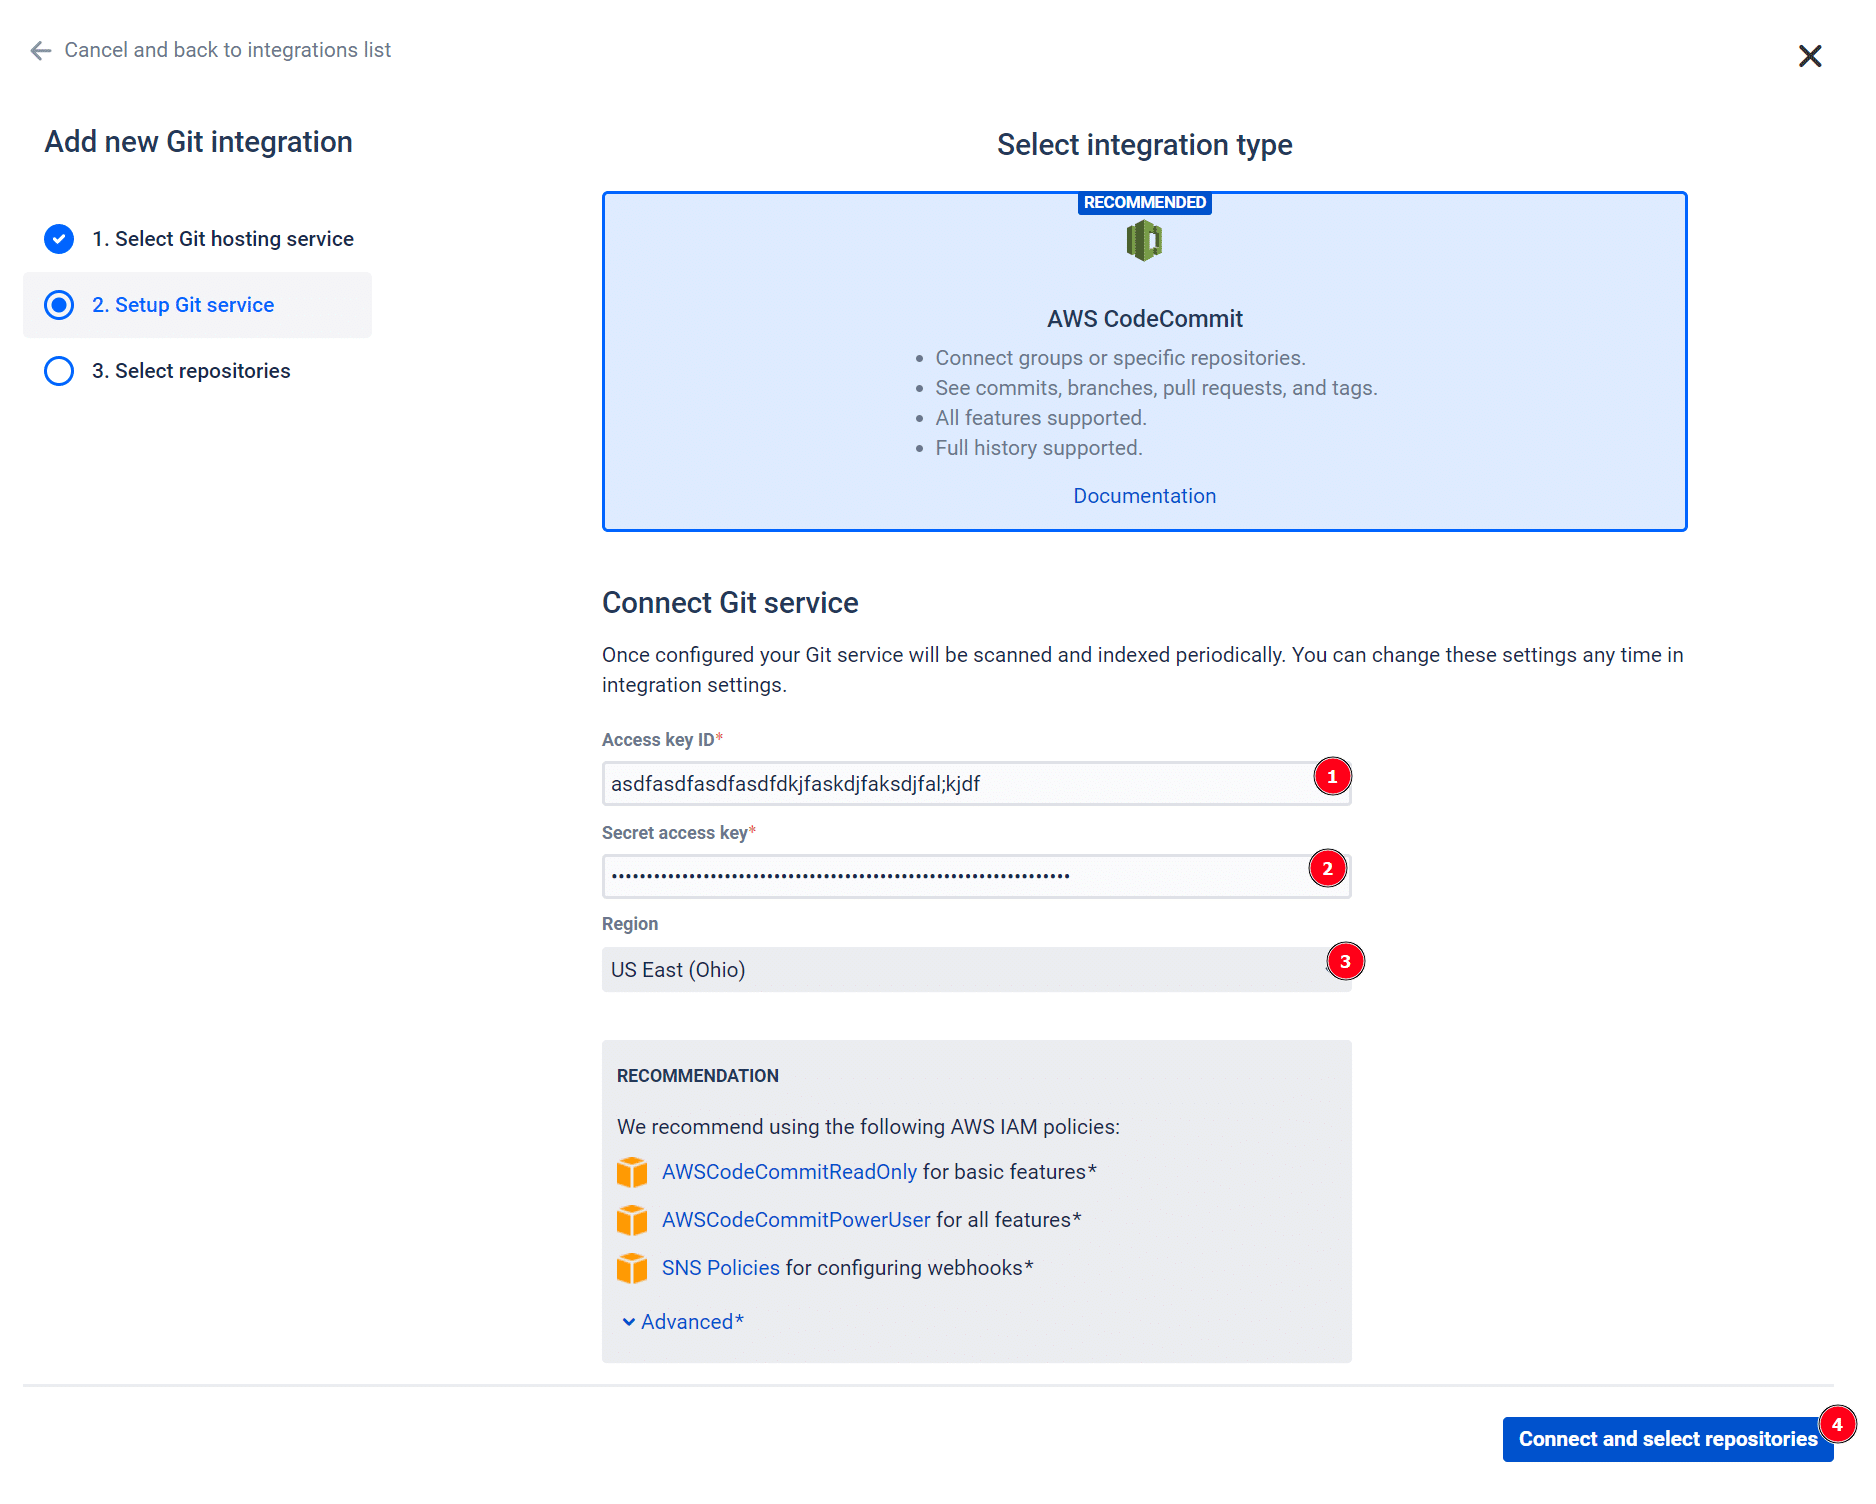
- Select the region where the CodeCommit repositories reside. The supported regions are listed on that page.
Please note that we recommend that you review and implement the AWS IAM policies listed on this screen, or you can review the required permissions here.
- Click Connect and select repositories to continue. On the following screen, the Git Integration for Jira Cloud app will read all available repositories from your AWS CodeCommit account.

- Select one or more repositories to connect to your Jira Cloud instance.
- Repositories of the logged-in AWS CodeCommit user can be automatically connected to Jira Cloud. Repositories that are added or removed from AWS CodeCommit will be connected or disconnected from Jira Cloud.
- Click Connect repositories to complete this setup.
- The AWS CodeCommit repositories are now connected to Jira Cloud.
If the connected Git host has newly added repositories, the Git Integration for Jira app will automatically add them to the git repositories configuration on the next reindex.
Linking AWS CodeCommit with Jira Issues
Linking items to Jira works the same across commits, branches, and pull requests. Any of these items that include a Jira issue key in the description or titles will be linked to the corresponding Jira Issue.
Create AWS CodeCommit Branch in Jira
On your Jira Cloud, open a Jira issue. On the Jira Git development panel, click Open Git Integration then click Create branch. The following dialog is displayed.
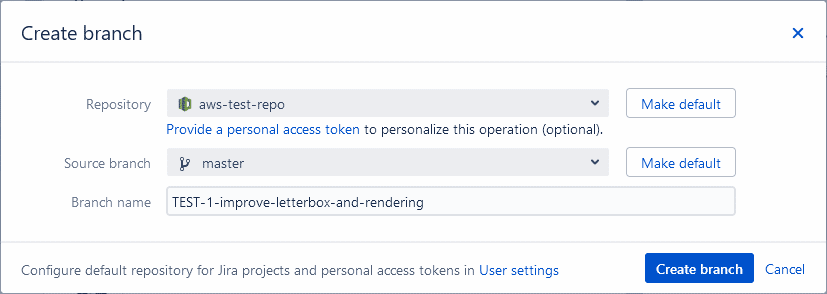
To create a Git branch from a Jira issue perform the following:
- Select a repository from the list.
- The selected repository will display the Git service logo to identify which Git host it is located from.
- If there are several repositories with the same name, the listed CodeCommit repositories will have their names attached with a region name. For example,
us-west-2/test-repo. - Use the search box to look for the specific repository that will be used.
- OPTIONAL Designate the repository to be the default selected repository for current Jira project. To configure default repositories for more than one Jira project – use the User settings page.
- OPTIONAL Choose a source branch. Designate the branch to be the default selected branch for the currently selected repository. To configure default branches for more than one repository – use the User settings page.
- Enter a Branch name or leave it as is (recommended).
- Click Create branch to complete this process.
Create AWS CodeCommit Pull Request in Jira
On your Jira Cloud, open the Jira issue where you previously created a branch. On the developer panel under Git integration, click Create Pull Request. The following dialog is displayed.
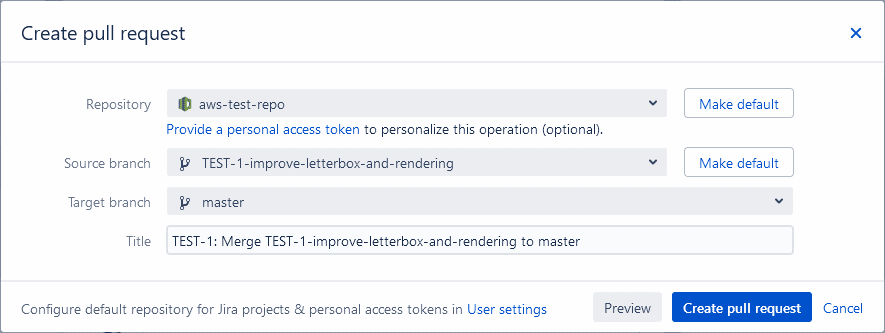
To create a pull request from a Jira issue follow these steps:
- Select a repository from the list.
- The selected repository will display the Git service logo to identify which Git host it is located from.
- If there are several repositories with the same name, the listed CodeCommit repositories will have their names attached with a region name. For example,
us-west-2/test-repo. - Use the search box to look for the specific repository that will be used.
- OPTIONAL Designate the repository to be the default selected repository for the current Jira project. To configure default repositories for more than one Jira project – use the User settings page.
- OPTIONAL Choose the newly-created branch as the Source branch. Designate the branch to be the default selected branch for the currently selected repository. To configure default branches for more than one repository – use the User settings page.
- Set master or main as the Target branch.
- Enter a descriptive Title or leave it as is (recommended).
- Click Create pull request to complete the setup.
Jira AWS CodeCommit Webhooks
CodeCommit doesn’t have webhooks but it has SNS triggers requiring a subscription confirmation. We recommend that you set up your account with full AWSCodeCommitPowerUser permissions, which will enable Git Integration for Jira to automatically create the SNS topic and subscription. If you would like to set up your webhooks manually, please review the following webhooks documentation.
Integrate Jira and AWS CodeCommit Today
Using an AWS CodeCommit integration with your Jira instance will maximize your team effectiveness and efficiency. Much like individual Zords coming together to create the much mightier Megazord, integrating AWS CodeCommit and Jira will make tackling development challenges possible. Improved visibility and collaboration between project managers,stakeholders, and developers directly from Jira increases efficiency and makes addressing issues a much simpler process!
Want to further optimize your Jira AWS CodeCommit integration? Learn how to leverage Smart Commits to perform actions in Jira with your commit messages.
Want to integrate Jira with your other repo hosting services? Take a look at these related step-by-step guides:

