

 GitKraken Desktop
 GitLens for IDEs
  GitKraken MCP
 GitKraken CLI
 GitKraken Insights
 Git Integration for Jira
 Supercharge Your Dev Team
  Secure Your Dev Team

This post is part of our new blog and video series dedicated to the “First 5 Years in Software Development.” This series was created specifically for early professionals coming out of school, as well as those who may be making a career change from another field or role into software development. Topics will include how to get your first development internship, tips for optimizing your resume, advice for your job search and interviews, navigating the corporate ladder, and more. Stay tuned for new posts and videos each month.
What’s up!? My name is Mikaela Caron, I’m an iOS Engineer at Lickability, and also a freelance developer, GitKraken Ambassador, and content creator. I make content on YouTube, Instagram, and Mastodon / Twitter about iOS development and freelancing. I also organize a monthly online meetup called iOS Dev Happy Hour.
I wrote this article to explain the benefits of having a profile README, how to create your own, and show a few examples of public profiles.
A profile README is a special repository on your GitHub profile page that you can use to share information about yourself. This README is the first thing people see when going to your GitHub profile, so many developers use it to showcase their skills, personality, and accomplishments. Think of it like a mini resume – lead with a few interesting things about you and include some of the most notable projects you’ve worked on, but be sure to keep it concise and easy to read.
Benefits of Having a Profile README
- Showcasing your skills: you can highlight your notable skills and accomplishments by including images, gifs, or videos of projects you’ve built or collaborated on. Many developers include a link to their profile README on their resumes.
- Employability: having a profile README can make you more attractive to potential employers. It shows that you are proactive and passionate about coding, which can set you apart from other candidates.
- Personality: having an online presence allows you to show off who you are! You can add your own unique style and personality – something that isn’t as easy to showcase in the black-and-white text on your resume.
- Collaboration: GitHub is a platform where developers can collaborate with each other. Having a profile README means other GitHub users can see if you have a particular skill they need for a project and gives them a chance to provide feedback on additional information or items you could add to stand out.
How to Set Up a Profile README on GitHub
Setting up your README can be accomplished in less than 5 minutes*. Let’s get started!
*(BUT choosing what to add to it could take significantly more time, if you’re indecisive like me 😅).
Step 1: Create a GitHub Account
If you don’t already have a GitHub account, create one by going to https://github.com/ and signing up. Your username is public and it’s how developers will tag you when collaborating on projects, so be sure to choose something appropriate!
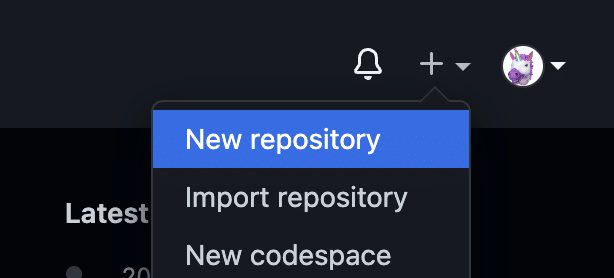
Step 2: Create a New Repository
Once you’re signed into GitHub, navigate to the top toolbar, click the plus (+) button, and select “New repository”.
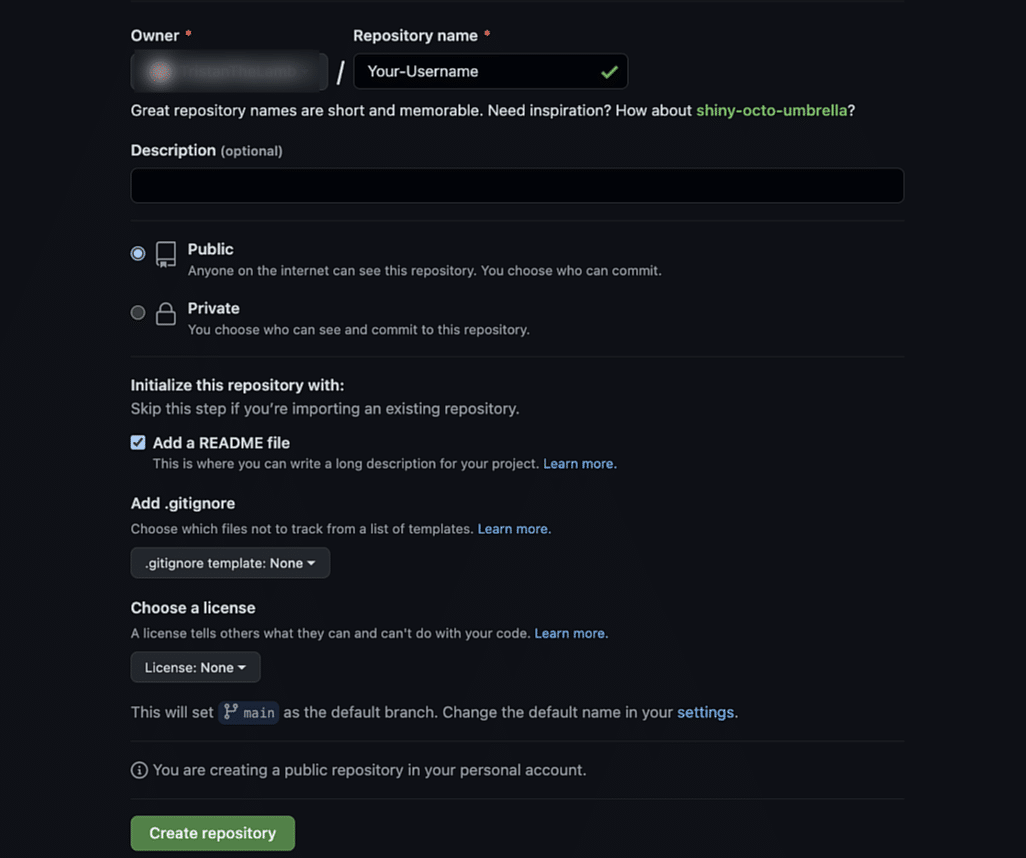
Step 3: Name your Repository
- Name your new repository the same as your username. It must match exactly.
- Set your repository to public.
- In the section, “Initialize this repository with” check “Add a README file.” This is a markdown file that will be added to your repository when it’s created.
- Click the green “Create Repository” button.
Step 4: Start Editing
You’ve done it! You’ve created the markdown file that’s used as your profile README! Now unleash your creativity and add whatever you want!
If you’re new to markdown or want a quick refresher, check out this GitHub post on how to apply basic styling and formatting.
README Examples
I’ve included a few profile README examples below. You can write a basic one, like mine, which shows all my different social media links and what I do. Or you can get more creative, like Jay’s, that shows their YouTube subscribers, when they’re live on Twitch, and even dynamically pulls in their latest blog posts and YouTube videos! The sky’s the limit!
If you aren’t sure where to start, try writing an “About Me” section that shares who you are and what you’re looking for. Use the flexibility of the file to add your own style and show off more of your personality than you would be able to in a resume. Don’t forget to list the coding languages you know, or the most important ones for your job search. Including prior experience or links to other projects on your GitHub profile that use these languages can help round out your experience and give prospective employers a better idea of your skills. If you’re actively job searching or networking, be sure to include links for how to contact you! Otherwise having various social media links, like I do, works just fine.
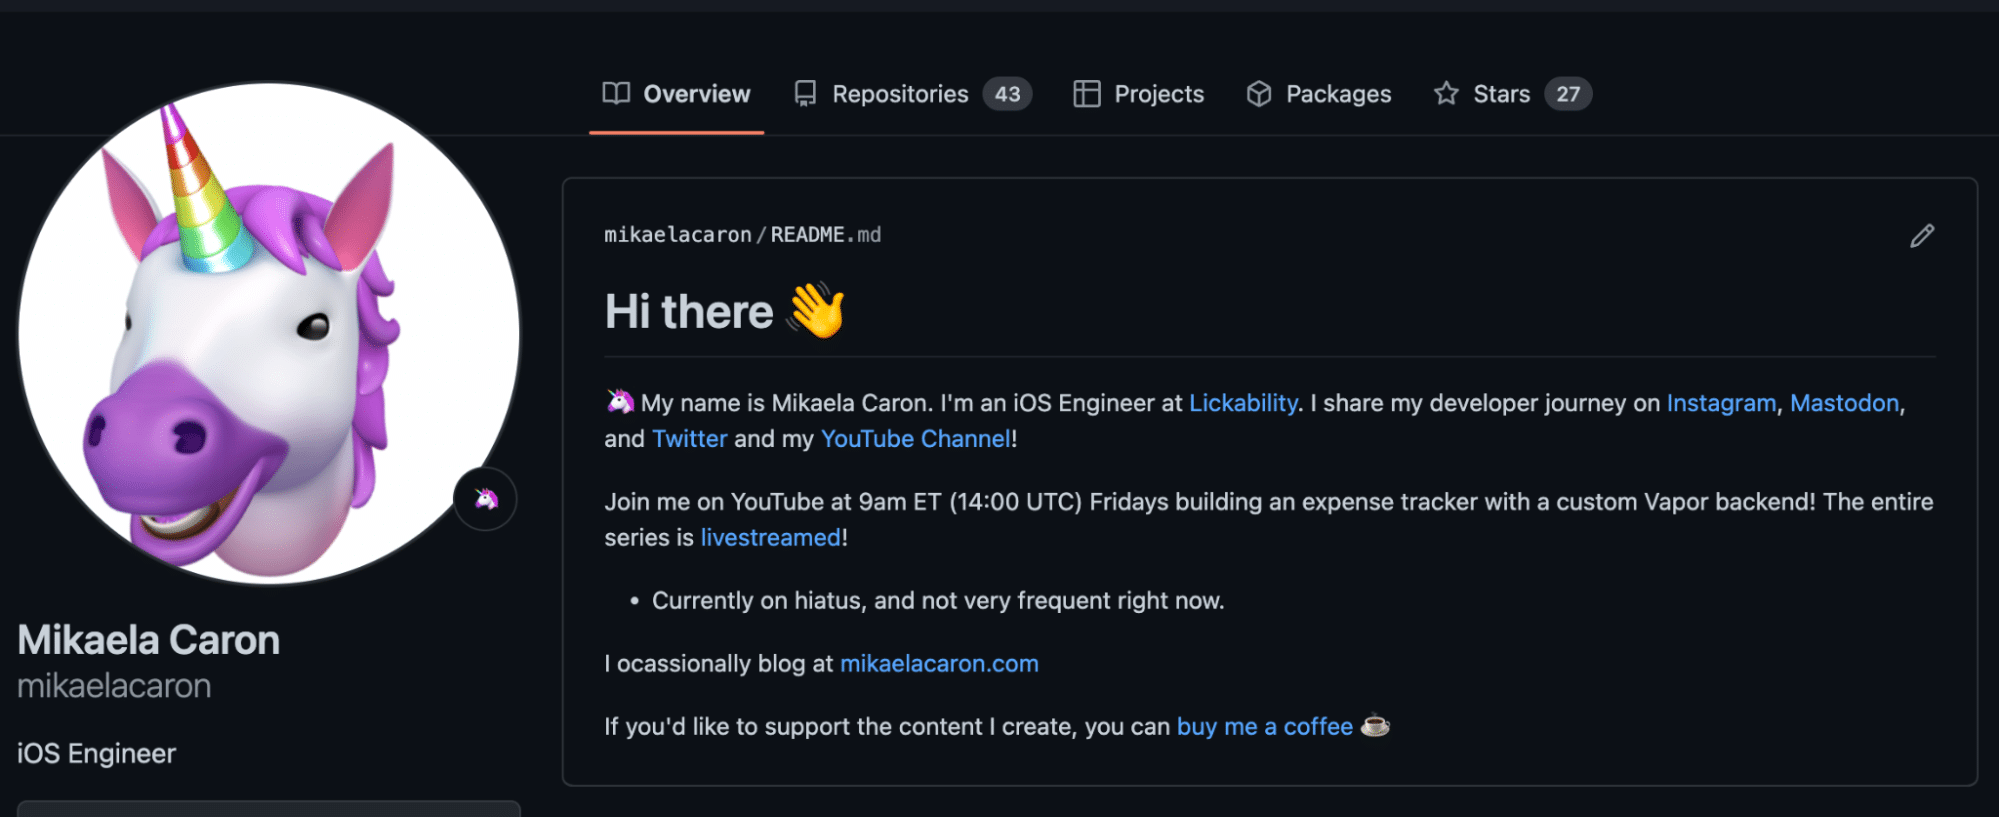
https://github.com/mikaelacaron
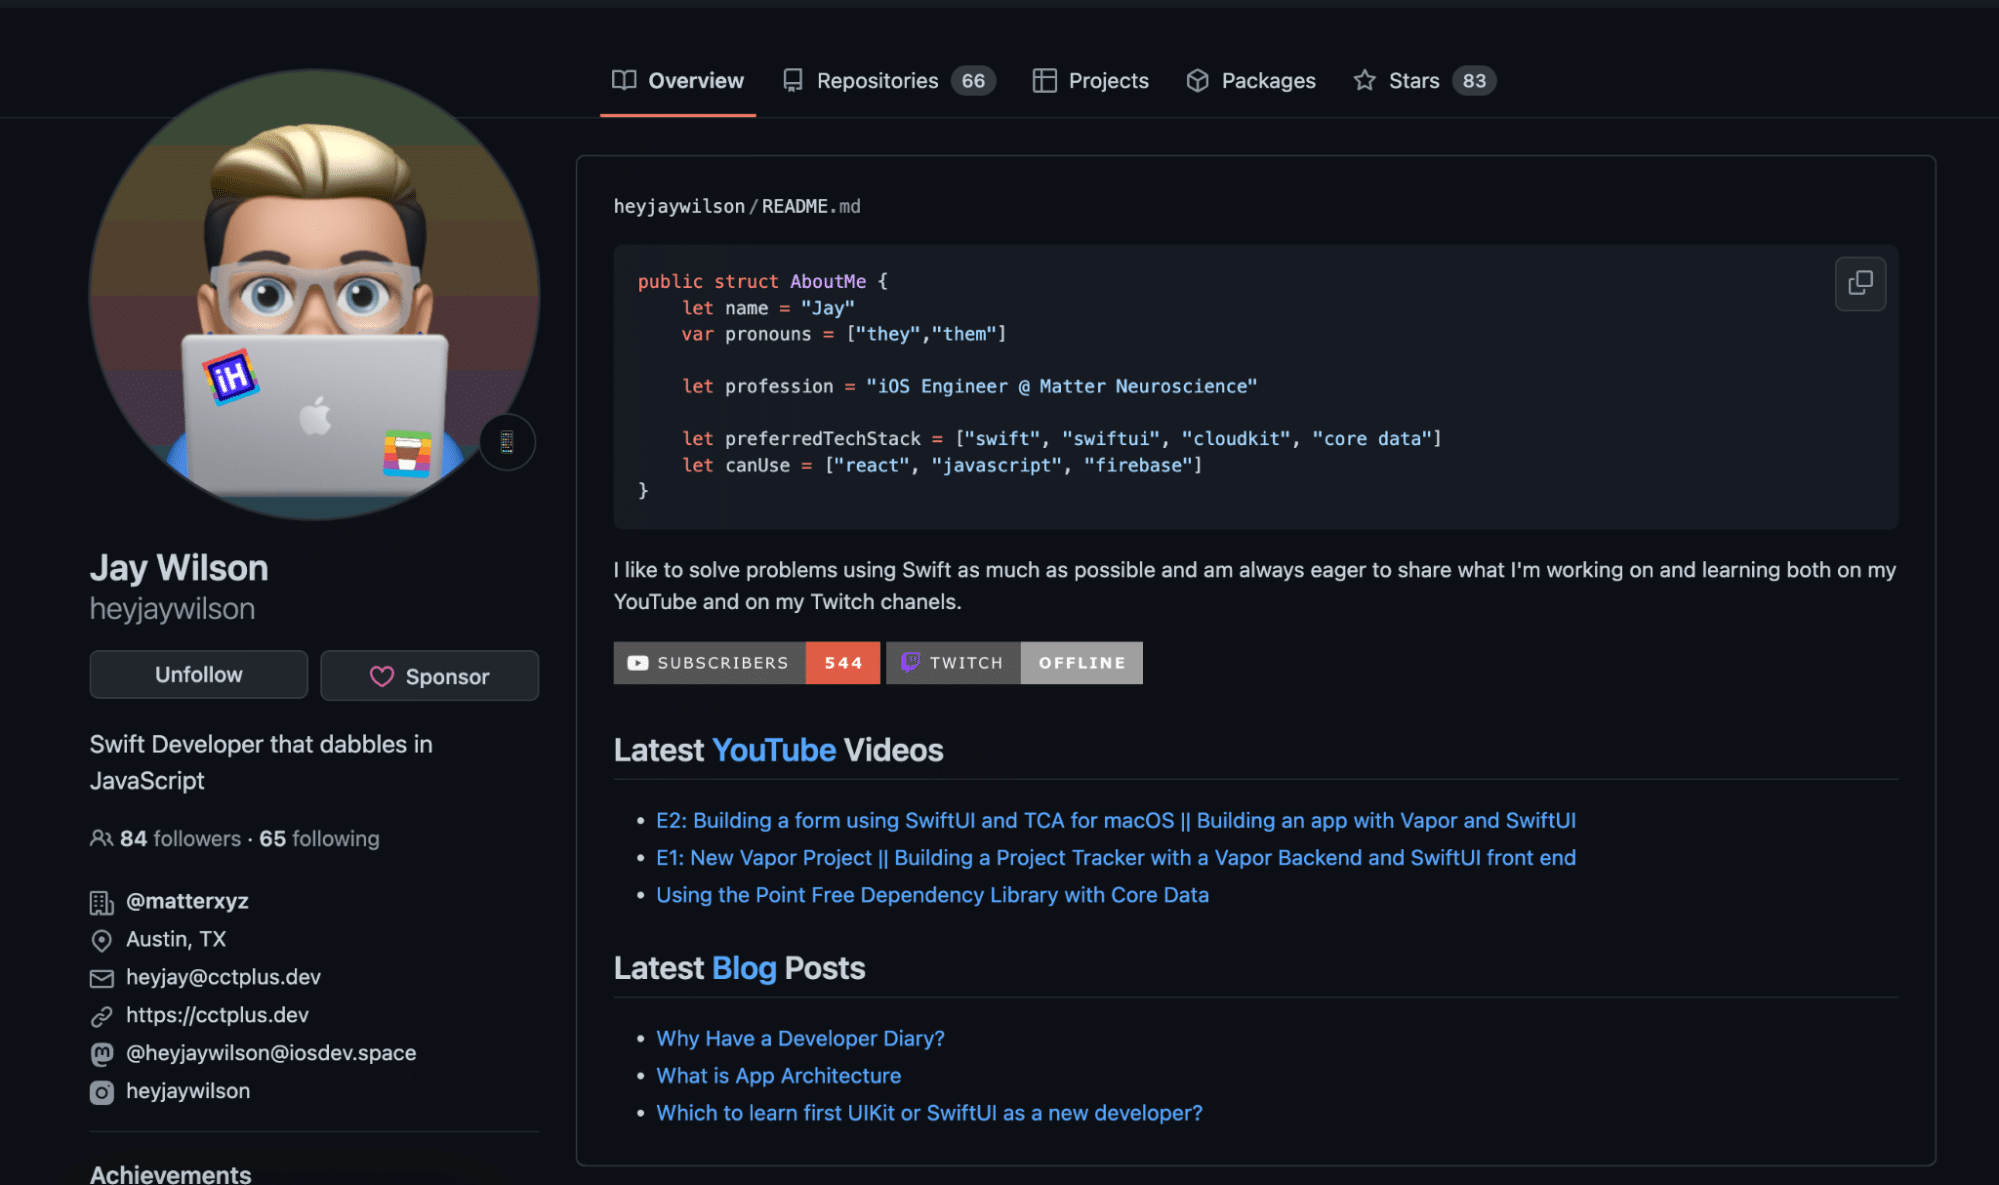
https://github.com/heyjaywilson
Conclusion
Creating a profile README is an excellent way to showcase your personality and skills in a concise way! You can show more about yourself than your resume allows, and point to your favorite projects to show off. Your profile can help you stand out in a competitive job market, so what are you waiting for? If you’ve got 5 minutes, go ahead and start building your profile README right now!


