 GitKraken Desktop
 GitLens for IDEs
 GitKraken MCP
 GitKraken CLI
 GitKraken Insights
 Git Integration for Jira
 Supercharge Your Dev Team
  Secure Your Dev Team

Setting up your first Git repository is a bit like writing your first “Hello World” program – it’s a fundamental step in your development journey! And just like “Hello World” introduced you to the basics of coding, creating a Git repo is the first step towards effective collaboration and project management.
Git is a version control system that allows you to track every change in your codebase, work on multiple features without confusion, and collaborate seamlessly with your team. GitKraken Desktop makes this process approachable, from a visual interface that simplifies complex tasks to integrations that enhance your workflow and keep everything organized.
In this guide, we’ll discuss five essential steps for setting up and managing your first Git repository using GitKraken Desktop. By the end, you’ll be well-equipped to handle your repository with confidence.
Step 1: Installing GitKraken Desktop
Before diving into Git, it’s crucial to have the right tools installed. GitKraken Desktop offers a user-friendly interface that makes managing Git repositories easier. Before getting started, you need to install Git and GitKraken Desktop.
Installing GitKraken Desktop
If you already have Git installed, excellent! If not, no worries – GitKraken comes bundled with Git. To begin, download GitKraken Desktop from the GitKraken website and follow the installation instructions based on your OS:
- Windows: Run the downloaded installer and follow the setup wizard.
- macOS: Drag the GitKraken application to your Applications folder.
- Linux: Follow the provided instructions for your specific distribution.
Creating an Account and Setting Up Your Profile
Once installed, open up GitKraken Desktop to create an account or sign in with an existing one. After logging in, you can set up your profile with your name and preferred email address. This information will be used for your commit messages, helping identify who made changes.
For more installation setup instructions (including video walkthroughs for each OS), check out our help center here.
Step 2: Creating and Initializing a Git Repository
Using GitKraken Desktop to Create a Repository
Before we dive into creating a repository, let’s understand what a repository (or “repo”) is. In short, a repository is a storage space where your project lives. It can be a local repository on your computer or a remote repository hosted on platforms like GitHub, GitLab, or Bitbucket. Repositories help you track changes, collaborate with others, and manage different versions of your project efficiently.
To set up a repo in GitKraken Desktop:
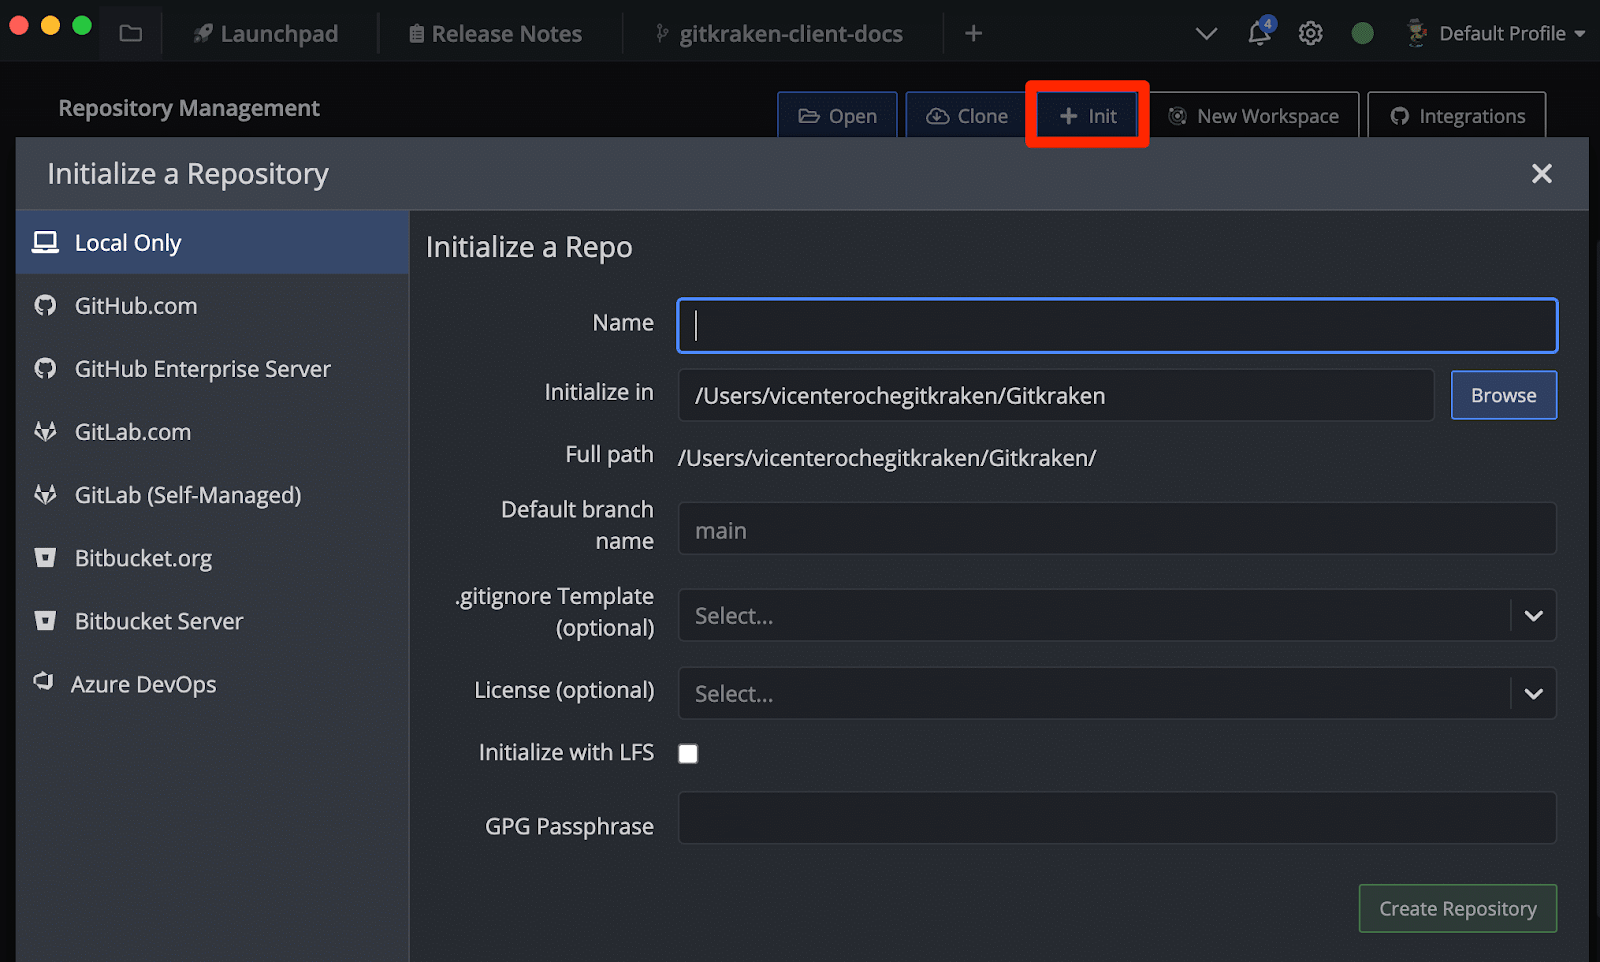
- Open GitKraken Desktop and click on the folder icon at the top left, or use the keyboard shortcut Alt + O (Windows/Linux) or Cmd + O (Mac) to open the Repo Management tab.
- Choose ‘Init’ at the top right corner to create a new repository. You’ll be prompted to enter a new repository path, optionally add a .gitignore template, and a license file.
You can find more detailed information about initializing repos in GitKraken Desktop here.
Cloning an Existing Repository
Cloning a repository is the process of creating a copy of an existing repository. This is useful when you want to work on a project that already exists or contribute to an open-source project (for example, forking a repo from GitHub). When you clone a repository, you get all the project files, commit history, branches, and tags from the remote repository.

If you’re working with an existing project, you can clone a repository:
- Navigate to
File > Clonein GitKraken Desktop. - Enter the repository URL from platforms like GitHub, GitLab, or Bitbucket.
- Choose a local directory to clone the repository. Once cloned, GitKraken Desktop will prompt you to open the project.
For more info about all the ways to open repos in GitKraken Desktop, check out this tutorial.
Step 3: Performing Basic Git Operations
Git uses a two-step process to save changes: staging and committing. Understanding when and how to use these steps is crucial for maintaining an organized and clean project history.
Staging
Staging is like preparing your work for final approval before it becomes part of the main project. When you stage files, you’re essentially saying, “These changes are ready to be included in the next snapshot of the project.”
When to Stage Changes
- After Completing a Small Task: Once you’ve finished a specific task or feature, stage the relevant files. This helps keep your commits focused and meaningful.
- Before Committing: Always stage your changes before making a commit. This gives you a chance to review what will be included in the commit.

How to Stage Changes
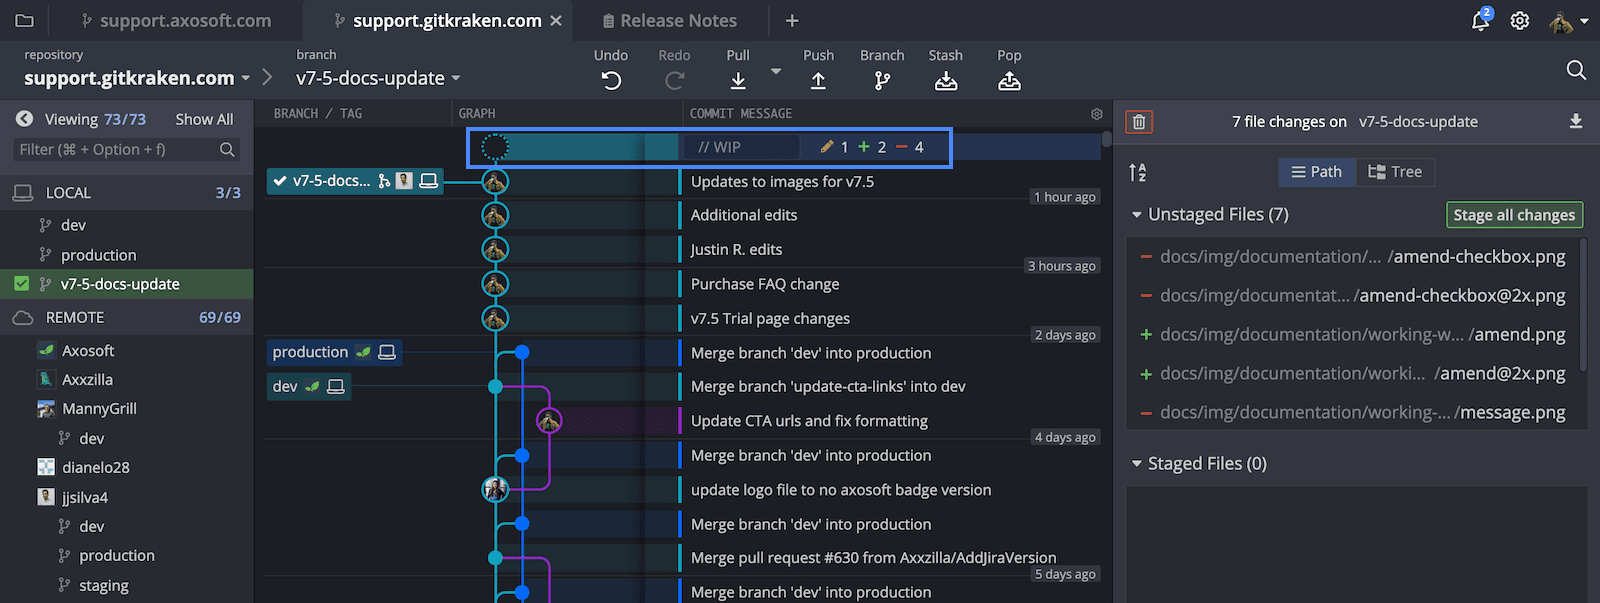
- Select the //WIP Node: This will show all your modified files in the Commit Panel.
- Hover and Click: Hover over the files to stage them. You can stage an entire file or specific lines within a file if only part of your work is ready.
- Use Shortcuts: GitKraken Desktop offers keyboard shortcuts to speed up the staging process.
Staging helps you review and refine your changes before committing, ensuring only the necessary modifications are included.
Unstaging
Unstaging is the process of removing changes from the staging area if you realize they’re not ready for commit.
When to Unstage Changes
- When Reviewing Your Changes: If you discover that some changes shouldn’t be included in the current commit, unstage them.
- To Split Commits: If you accidentally staged too many changes, unstage some files or lines to create more focused commits.

How to Unstage Changes
- Select the Staged File: Click the
-button to unstage the entire file. - Review the Diff: Click on the file to view the differences and selectively unstage lines or hunks.
Unstaging gives you control over your commit content, helping maintain clarity and organization in your project history. More details about staging and unstaging changes can be found in the GitKraken help docs.
Committing Changes
Committing is the process of saving your staged changes to the project history. Each commit should also be accompanied with a clear message explaining what was done and why.
When to Commit Changes
- After Staging Relevant Changes: Commit only after you’ve staged changes that logically belong together.
- At Logical Breakpoints: Commit when you reach a point where a feature is complete, a bug is fixed, or a task is finished. Frequent, smaller commits are often better than infrequent, large ones.
How to Commit Changes
- Start your Commit: To make a commit in GitKraken Desktop, select your Work in Progress and to view recent changes on the Commit Panel.
- Write a Descriptive Message: Your commit message should clearly explain what the commit does. Good commit messages help your team understand the changes and why they were made.
- Use GitKraken’s Interface: Enter your message in the commit message box and click the
Commitbutton. You can also commit and automatically push your changes to the remote by selecting the Up arrow on the Commit button.

Frequent, well-described commits make it easier to track the history of a project and understand the evolution of the codebase. Discover more about committing changes in our YouTube tutorial:
Pushing and Pulling Changes
To share your changes with others or get the latest updates:
- Push your commits to the remote repository by dragging and dropping your branch onto a remote or clicking ‘Push’ in the toolbar in GitKraken Desktop. This makes your changes available to your team.
- Pull operates similarly – you can pull the latest changes from the remote repository with the same drag-and-drop action or by clicking ‘Pull’ in the toolbar. This ensures you have the most up-to-date version of the project and can resolve any conflicts early.
These operations keep your local repository in sync with the remote one, facilitating smooth collaboration and reducing integration issues. Find more information about pushing and pulling in the GitKraken Desktop help documentation.
Step 4: Managing Branches Effectively
Branches are crucial for managing different versions of your project, allowing you to work on new features or bug fixes without affecting the main codebase:
- Create a new branch by right-clicking on the main branch in GitKraken Desktop and selecting ‘Create branch here.’
- Name your branch, such as ‘develop’ or ‘feature-branch.’
- Switch between branches by double-clicking on the desired branch in the branch list.
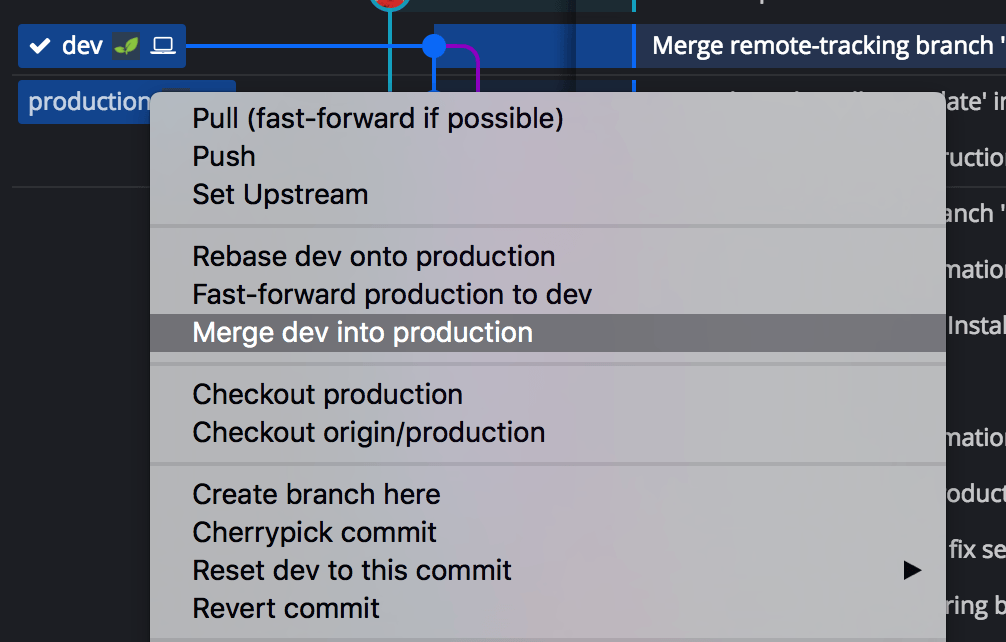
Merging Branches
Once you’ve made changes in a branch, you can merge them back into the main branch:
- Switch to the main branch by double-clicking it.
- Drag and drop the feature branch onto the main branch in the Commit Graph.
More info about creating branches and merging can be found here.
Step 5: Best Practices for Repository Management
Consistent Commit Messages
Good commit messages are vital for maintaining a clear project history:
- Be descriptive but concise. Explain what changes were made and why.
- Follow a format, such as starting with a capital letter and using the present tense.
- Consistent commit messages help team members understand the history of changes.
Regularly Pushing Changes
To avoid large, unwieldy commits:
- Commit frequently, breaking down changes into manageable pieces.
- Push changes regularly to keep the remote repository updated and facilitate collaboration.
- Frequent commits and pushes make it easier to track changes and collaborate with others.
Utilizing Branches Effectively
Branching helps you develop new features, fix bugs, and changes before they are integrated into the main project. As a general rule of thumb:
- Use feature branches for new features and bug fixes.
- Keep the main branch clean and stable, merging changes only after thorough testing.
Final Thoughts
By following these five essential tips and utilizing GitKraken Desktop, you can make the most of Git’s powerful version control capabilities. Remember to install the necessary tools, create and manage your repository effectively, perform basic Git operations, manage branches wisely, and follow best practices for repository management!
If you’re ever in doubt, make sure to check out our Help Documentation and subscribe to our YouTube channel so you never miss a new tutorial!


