Sarah is an IT professional based in Scotland. She is passionate about IT Ops and enjoys helping others learn new skills. You can find her writing more content over at www.techielass.com
Visual Studio Code (VS Code) is a popular open-source code editor developed by Microsoft. It offers a lightweight yet powerful environment for developers or operations engineers for coding and debugging.
VS Code includes syntax highlighting, code completion, debugging, Git integration, and many more features. It also supports various extensions and plugins, enabling users to customize their workflow and boost productivity.
VS Code is my favorite code editor, and I use it daily. It’s a versatile tool that helps me edit markdown documents, write Azure Bicep code, or even help me connect to SQL databases.
This article will cover how to install VS Code on your machine, explain the interface, and share tips on how to customize the interface to suit your workflow. I’ll also introduce the concept of extensions and why they are essential. Lastly, I’ll share some beginner tips to help you get started with VS Code.
Download VS Code for Windows
There are several ways to install VS Code on your Windows machine. You can download the installation file using the process below:
- Download the Visual Studio Code installer for Windows.
- Once downloaded, double-click on the installer to start the process. This should only take a minute.
Alternatively, if you use Windows Package Manager, you can open up a command prompt window and type in the command:
winget install Microsoft.VisualStudioCode -y
Or if Chocolatey is your package manager of choice, you can open up a command prompt window and type in the command:
choco install vscode -y
Download VS Code for Linux
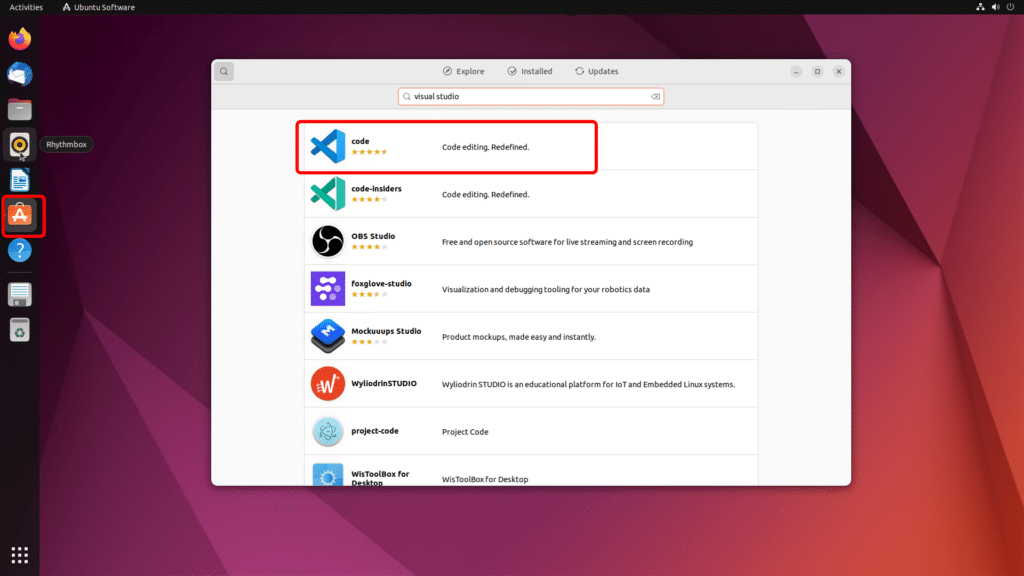
There are different methods for downloading VS Code depending on the flavor of Linux you use. For Ubuntu, you can follow these steps:
- Open the Software Catalogue
- Search for Visual Studio Code
- Click on code
- Then click on Install; you may be prompted to put in your password to proceed with the Install

Check out the official documentation for instructions regarding how to download VS Code on other versions of Linux.
Download VS Code for Mac
To install VS Code on your Mac, follow these instructions:
- Download Visual Studio Code for macOS.
- Open the browser’s download list and locate the downloaded app.
- Use double-click for some browsers or select the ‘magnifying glass’ icon with Safari.
- Drag Visual Studio Code.app to the Applications folder, making it available in the macOS Launchpad.
- Open VS Code from the Applications folder by double-clicking the icon.
- Add VS Code to your Dock by right-clicking on the icon in the Dock to bring up the context menu and then selecting Options and Keep in Dock.
Getting Set Up in VS Code
Once you have VS Code downloaded and installed on your machine, you can start using it and customizing it! Let’s walk you through the interface of VS Code.

A menu system is at the top of your screen, much like any other Microsoft product. The menu system will give you access to settings such as the font size displayed on the screen and what colour scheme VS Code uses.
The editor section takes up the largest section of the screen. This is where you will work on your files; you have many files open and edit them either side by side in a comparison mode or have them available as many different tabs.
Down the left-hand side of the screen, there is the activity bar. This lets you switch between views and gives you additional context indicators, such as how many changes to Git are waiting to be staged.
The sidebar will give you different views while working on your project; my favourite is the Explorer, which lets you see the files and folders within your project.
At the bottom of the screen is the status bar. It gives you information about the project, files you are editing, and some plugins also have a status indicator here.
You can display different panels within VS Code. This could be used to display a debugging panel or the integrated terminal. By default, the panel is in the lower half of your screen, but you can move it to a vertical position if that is preferable.
Customizing VS Code Settings
There are a lot of settings you can customize within VS Code to make the editor fit your preferred workflow.
Changing the Theme
The first setting I like to configure is the color scheme. I prefer the light theme when working with VS Code, but there are many built-in choices. If you click File> Preferences > Settings, navigate to Workbench > Appearance. You will see the option to configure the Color Theme.
Check out some of the Best VS Code Themes in our recent blog post.
Turning On Auto Save
The next setting on my customization list is to turn on Auto Save, which will save your changes after a certain delay. To configure Auto Save go to File> Preferences > Settings, then navigate to Text Editor > Files. You will see the Auto Save option; turn that to afterDelay. You can also configure the Auto Save Delay time; the default 1000 milliseconds works for me.

Setting the Indent of Your Explorer Window
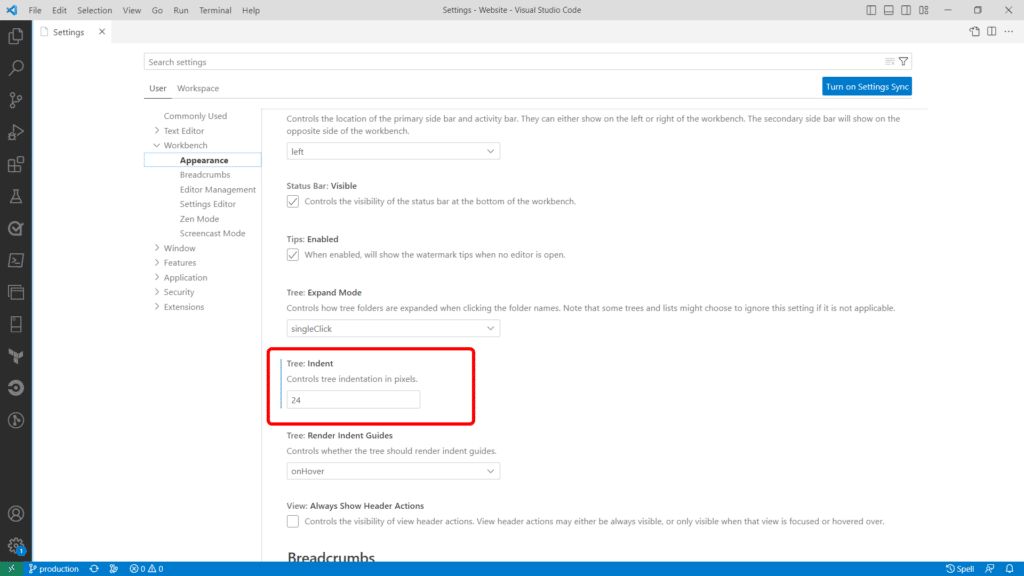
Another setting that I often set is the indent of my Tree or Explorer window. Changing the indent gives the files and folders a more distinct indent and can be easier to see at a glance. You can change it by going to File > Preferences > Settings and Workbench > Appearance. Scrolling down, you will see a setting called Tree: Indent. I like to set that to 24.

Installing VS Code Extensions
VS Code offers a variety of extensions to enhance its functionality. These extensions are crucial for users who want to improve their workflows and processes. The extensions can add features and tools that aren’t available in the default settings.
For example, extensions can highlight syntax for various programming languages, code completion, debugging support, and integrations with other development tools.
Using extensions in VS Code can help users save time and increase their productivity by automating repetitive tasks and providing quick access to commonly used features.
Extensions are found within the VS Code extension marketplace. The extensions within the marketplace are created by vendors or by community members. A vast selection of extensions is available, and it’s easy to find an extension that meets your specific needs.
You can follow these simple steps to install an extension in VS Code:
- Open VS Code and click on the Extensions icon on the left-hand side of the screen
- Search for the extension you want to install
- Click on Install once you have found the extension you want to install
- You may need to close and restart VS Code to activate some extensions
Check out our list of the Best VS Code Extensions!
Beginner Tips for Using VS Code
How to Create a New File in VS Code
To create a new file within VS Code, you can go to File> New File. You can then give the File a name, set the file extension time, and save it via File> Save.
Use Keyboard Shortcuts
VS Code has keyboard shortcuts built into it by default that can save you time and increase your productivity.
You can go to File> Preferences > Keyboard Shortcuts to access a list of available keyboard shortcuts. Or you can use the shortcut Ctrl+K Ctrl+S (Windows/Linux) or Cmd+K Cmd+S (Mac) to pull up the list.
Another GitKraken Ambassador, Njong Emy, has written an excellent article covering twenty shortcuts worth learning within VS Code.
Debugging Code in VS Code
You can also investigate and fix errors in your code using VS Code.
To start debugging, first ensure that your code has a breakpoint set at the desired location by clicking on the left-hand side of the line number where you want to stop execution.
Then, click on the Run menu and select Start Debugging or use the keyboard shortcut F5.
The debug console will appear at the bottom of your screen, and execution will pause at the breakpoint. From there, you can use the debug toolbar to walk through the code, view variables and call stacks, and add or remove breakpoints.
You can also set conditional breakpoints that only pause execution if certain conditions are met. Once you have found and fixed the error, click on the Run menu and select Stop Debugging to exit debugging mode. By using the debugging tools in VS Code, you can more quickly and efficiently find and fix errors in your code.
Working with Multiple Files in VS Code
Working with multiple files in VS Code is easy and intuitive.
If you have multiple files open in VS Code, you can switch between them by clicking on their tabs at the top of the editor. You can also use the keyboard shortcut Ctrl+Tab (Windows/Linux) or Cmd+Tab (Mac) to cycle through open files.
Additionally, you can split the editor into multiple panes by clicking on the Split Editor icon in the top-right corner of the editor or using the keyboard shortcut Ctrl+ (Windows/Linux) or Cmd+ (Mac). This is great for comparing two files side by side.
Get Started with VS Code Today
We’ve covered the installation of VS Code, shared tips on how to set up the interface to your preferences, introduced the notion of extensions, and shared some beginner tips.
Customizing and using VS Code for your workflows can significantly impact your productivity and efficiency. You can use it for various programming languages and frameworks, and it’s constantly being updated and improved by the VS Code community. So why not try it and see how it can improve your coding experience? With some customization, you can transform VS Code into the ultimate tool for your workflow.
 GitKraken MCP
 GitKraken Insights
 Dev Team Automations
 AI & Security Controls


