GitKraken Desktop
 GitLens for IDEs
  GitKraken MCP
 GitKraken CLI
 GitKraken Insights
 Git Integration for Jira
 Supercharge Your Dev Team
  Secure Your Dev Team
 The term commit is fundamental to how Git functions as a version control system. It is important to first understand what a commit is before learning how to perform the Git commit command and how to perform other actions related to commits in Git.
What is a Git commit?
In Git, a commit is a snapshot of your repo at a specific point in time.
To help further understand what a Git commit is, we need to review your Working Directory vs your Staging Directory and how files changes are reflected in your Git repository.
Think of your working directory as your “in progress” working area; here, created or modified files are not yet reflected in your Git repo. Changes made to files in your working directory only exist locally on your machine.
Git Stage Files
In order to apply changes from your working directory to your Git repository, you must first stage them in your staging directory.
From here, your changes can be saved in your repo by performing a Git commit.
Now, each Git commit will represent a snapshot of your repo at that point in time, and all of your commits will come together to form your repository’s history.
Git Workflow
Traditionally, a Git workflow will involve the following steps:
-
- Make changes in your working directory
-
- Stage changes in your staging directory
-
- Commit changes to apply them to your Git repository
OK, now that we’ve answered the question of what is a Git commit, let’s dive into how to Git commit using the cross-platform GitKraken Desktop, and the associated actions you can perform with Git commit commands in the CLI.
How many times do you commit each day in Git? GitKraken Desktop will speed up the process by 2.5x 🤯. Don’t believe us? Try it for yourself. ⬇️
How to Git Commit in GitKraken
Let’s review the many actions you can easily perform with your commits with GitKraken Desktop, including how to add, amend, delete, and more.
In GitKraken Desktop, when you modify, add, delete, or rename any files in your repository, your Work-In-Progress, or WIP, will display at the top of the graph.
When you click the WIP node in GitKraken Desktop, all affected files will be listed in the Commit Panel on the right side. Additionally, GitKraken Desktop will display a color-coded icon next to each file to denote the change type: added, modified, renamed, or deleted.

This is really helpful because it provides you immediate context to the files in your repository; no need to run a command!
Staging Files in GitKraken Desktop
To stage a file in GitKraken Desktop, simply hover over the file name in the right Commit Panel and hit Stage File.

A benefit offered in GitKraken that is absent from the command line is the ability to only stage individual lines or hunks of a file. You can accomplish this by viewing the file’s diff.
Viewing the File Diff in GitKraken Desktop
To view the file’s diff in GitKraken Desktop, simply click a file from the right Commit Panel. From here, you can elect to stage or discard individual lines or hunks of code.
Discarding Changes in GitKraken Desktop
You can discard all changes made to a file in GitKraken Desktop by right-clicking the file on the Commit Panel and selecting Discard changes.

Furthermore, you can discard ALL changes made to all files in your WIP by clicking the trash icon 🗑 at the top left of the Commit Panel.

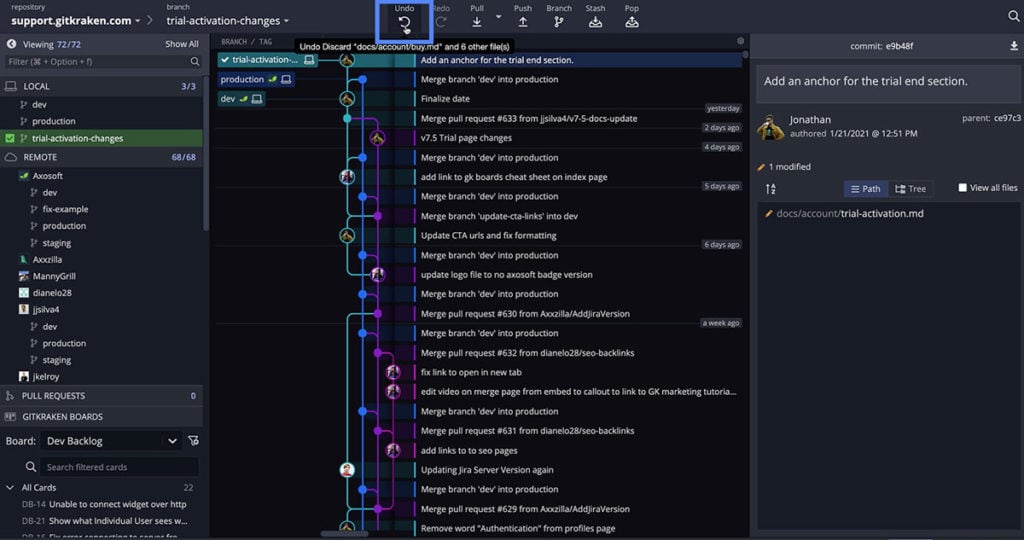
What if you discard something by mistake in GitKraken Desktop?
One of the best parts about using a tool like GitKraken Desktop to manage your projects is the ability to quickly undo, or revert, an action made by mistake. GitKraken Desktop makes it downright magical in just one click.
If you discard a change or file by mistake, simply click the Undo button in the top toolbar to revert the discard.
Adding a Git Commit Message in GitKraken Desktop
When you’re ready to commit your staged changes in GitKraken Desktop, be sure to type a commit summary and description in the commit message field before clicking the button to commit. You can also use keyboard shortcut Cmd/Ctrl + Enter.
After you have committed your changes, your WIP node will be transformed into a commit . From here, you can click on your commit to review the changes from this specific point in time.
Revert a Git Commit with GitKraken Desktop
Similar to how you can revert a discard you made by mistake, GitKraken Desktop makes it quick and easy to undo a Git commit using the magical Undo button.
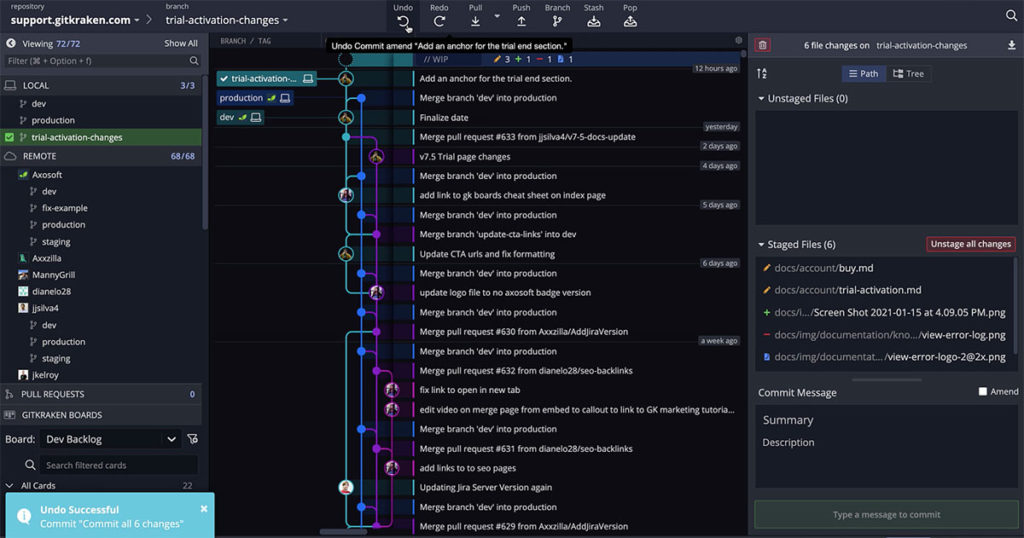
GitTip: Learn more about how to revert a Git commit, including other options for discarding or amending your history.
Amend a Git Commit in GitKraken Desktop
Let’s say you’ve made an error in a Git commit messages and need to make a correction. You can amend a commit message for the most recent commit in GitKraken Desktop by selecting the commit from the central graph. From here, click on the commit message to start editing the text, then click Update Message to save your changes.
This can be a lifesaver if you realize you’ve made a mistake on your last commit.
Commit 2.5x faster 🏎💨 using GitKraken Desktop compared to the command line. Seriously. Test it for yourself. ⬇️
Git Status
If you’re not using the powerful GitKraken Desktop to visualize your repo history, you can always run the git status command in the CLI to check which files have been staged and exist in your staging directory.
In this example, after the git status command has been performed, you can see that the trial-activation.md file has been modified, in addition to the other two.
How to Git Commit in the Command Line
In order to commit these changes in the CLI, you will need to stage the changes with the git add command, followed by the name of the file.

This will stage the trial-activation.md file. Ah, but you’re not done yet! You still need to save the changes to your repository by performing the git commit command.
How do I add a Git commit message?
To add a Git commit message to your commit, you will use the git commit command followed by the -m flag and then your message in quotes. Adding a Git commit message should look something like this:
How do I amend a Git commit?
Now, if you can see from the example above, there is a typo in the last word. So, how do you make a Git commit message change?
To amend a Git commit, you’re going to use the git commit command followed by --amend and then the amended Git commit message. It should look something like this:
Can I add multiple modified files using the Git commit command?
If you have numerous modified files sitting in your working directory, it can be time-consuming to add them one at a time. Speed up the process by using the git commit command followed by the -a flag. This will add all of the modified or deleted files in your working directory to the current commit. It should look something like this:
Ready for an easier way to commit your code changes in Git?
The GitKraken Desktop will give you more confidence staging, saving, and committing your file changes in Git with its simple user interface and clear organizational structure.