GitKraken Desktop
 GitLens for IDEs
 GitKraken MCP
 GitKraken CLI
 GitKraken Insights
 Git Integration for Jira
 Supercharge Your Dev Team
  Secure Your Dev Team
 The Git worktree command allows you to checkout and work in multiple Git branches simultaneously. Now, what situations might you utilize this action?
Imagine you’re in the middle of making numerous changes on a project with multiple new dependencies introduced with various WIP changes. What would happen if you suddenly have to work on a hotfix in another branch? For many people, the normal workflow would be to use Git stash to save your current work, checkout the hotfix branch, conclude that work, then re-checkout the branch you were originally on and pop your stash. If that sounds inefficient, the makers of Git agree with you. This is where Git worktree comes in.
Instead of that stash and checkout flow, you can simply add a new worktree entry and change directory into the needed branch.
For example, imagine you’re working on a project inside the main branch, but need to test and approve changes applied in a feature branch. With Git worktree, you simply tell Git to checkout the feature branch in a different directory, outside your present working directory and change to that directory; from here, you can do your work and change back to the original directory to find all your work in progress awaiting you, just as you left it.
Review of Git Branches
Before we take a look at how to use Git worktree in GitLens for VSCode and the command line, let’s first do a quick refresher on Git branch.
In Git, a branch is a pointer to one specific commit, while a commit is a snapshot of your repository at a specific point in time. Your branch pointer moves along with each new commit you make.
By default, Git only tracks and moves that pointer along on one branch at a time. The branch you selected with Git checkout is considered your “working tree”.
Just like a tree in the forest, a Git worktree can have several branches at once, which is exactly what the Git worktree command allows you to do.
To keep things organized, Git worktree places each branch into a different specified folder in your file system. To move between the multiple branches on the worktree, you simply change directory to work against the needed branch.

GitLens can help you stay organized and on track with your tasks and projects. Unlock the full power of Git in VS Code for free!
Git Worktree Concepts
Git worktree is a powerful command with a number of options. For our purposes, we will only be focused on working with branches, as that is the most common use case. We will be going through Git worktree examples with the following commands:
- Git Worktree Add
- Git Worktree List
- Git Worktree Remove
See the official Git documentation for more information on other ways you can leverage Git worktree.
Git Worktree Add
A Git worktree will always point to a folder on your file system while referencing a particular commit object, like a branch. In order to work in multiple checked out branches at once, you need to add each branch as a new working tree to the Git worktree. There are 4 possible scenarios you can encounter when using Git worktree add:
- Add a new working tree to a directory that shares the same name as the branch (the most common method)
- Add a new working tree to a directory with a different name as the branch
- Create a new Git branch and add a new working tree to a directory that shares the same name as the branch
- Create a new branch and add a new working tree to a directory with a different name as the new branch
We will cover how to do each of these in the Git worktree examples later in this article.
It is important to know that whatever path you choose, you can only ever have one working tree per directory. When you create the new working tree, the target directory must be empty, otherwise, the command will fail and you will get an error message.
Git Worktree List
In order to see what branches are currently active as working trees, you need to tell Git to list them with the Git worktree list command. The main working tree is listed first, followed by each of the linked working trees.
The output details include the path of each working tree, the commit hash, and the name of the branch currently checked out in that entry.
Git Worktree Remove
In order to keep your Git worktree in order, you will need to delete entries from time to time. No matter how the worktree entry was added, you will remove them the same way: by specifying the folder to be removed. And you don’t need to worry about specifying the branch name inside that folder.
If there are uncommitted changes in a particular folder Git will not allow you to remove it by default. You can override this restriction by using the --force option. As with any use of -f, be careful and make sure you know what you’re doing before overriding Git’s safety precautions.
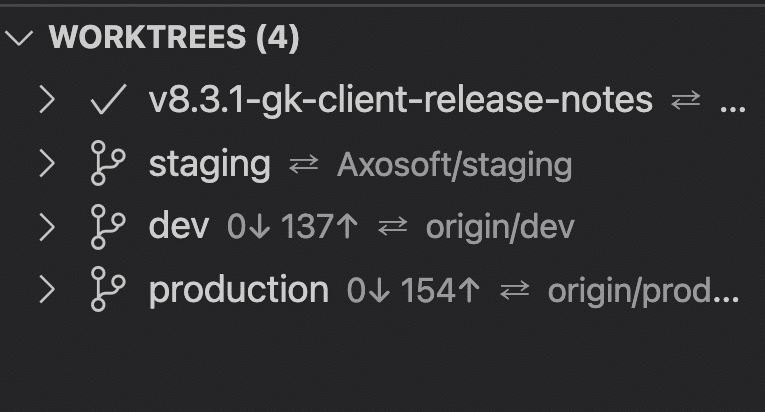
GitLens Worktrees
Worktrees in GitLens for VS Code is a GitLens+ feature requiring a GitLens+ or GitLens+ Pro account. GitLens+ users can leverage Worktrees on public repositories, while GitLens+ Pro users can use Worktrees on all repositories, public and private. You can read more about GitLens+ Features here.
Worktrees in GitLens can be viewed, by default, under the Source Control menu in the VS Code Sidebar. You can also open up the Worktrees menu by using the VS Code Command Palette, ⇧⌘P and typing GitLens: Show Worktrees view.
Worktrees is just one of the many powerful features you can unlock with GitLens+. What are you waiting for?
Sign up for GitLens+
Git Worktree Add with GitLens
In this Git worktree example, we’re going to review how to add a worktree entry with GitLens Worktrees, covering all 4 possible cases.
To start the process of adding a worktree entry with GitLens Worktrees, simply click the + icon in the Worktree menu. This will open the Command Palette and ask you to choose which existing commit-ish to use for the base of your new worktree entry.

Commit-ish
A quick note about that strange term “commit-ish”. Commit-ish refers to Git identifiers that eventually point to a Git commit object, like a tag, a branch, or an individual commit. For example, when referring to the tip of the commit graph, you can refer to a specific commit by the full 40 character hash number, the truncated 7 character hash number, the tag name, or “HEAD”. All of these methods eventually point you to the same reference.
For our purposes, we will only use this term for branch names, as that is the most common use case. But remember: you can add individual commits even in a detached HEAD state. See the official Git documentation for more information.
Once you have selected your base branch (most common), tag, or commit, you will be prompted to select a folder that will be the base for the worktree entry. Remember, each worktree entry needs to have its own empty folder to complete the process.

Once you have selected the base folder in your local file system, you will be presented with 4 options in the Command Palette.

Let’s take a closer look at the 4 creation options you will be presented with inside the VS Code Command Palette drop down menu, which is shown in the image above when you are adding a new worktree entry.
How do you use Git worktree add for an existing branch using the same name as the working directory with GitLens?
Choosing the option: Create Worktree for branch <branch-name> will create the worktree entry in a folder with the same name as the branch. The full path to that branch will be inside a new folder, with a directory name taken from the original folder, appended with the term .worktrees.
For example, let’s say you want to create a worktree based on the branch dev. Let’s also say you are working in a directory called vscode-gitlens and have selected the next highest directory to base the new worktree entry’s folder, ... Your new worktree entry would be at ../vscode-gitlens.worktrees/dev relative to your present working directory.

How do you Git worktree add to create a new branch using the same name as the working directory with GitLens?
Choosing the second option from the Command Palette drop-down menu: Create a New Branch and Worktree from branch <branch-name> will present you with a new option from the Command Palette to name the new branch. The new branch’s first commit will be the latest commit on the branch you specified in the previous step.

Once you have named the new branch, GitLens will create the new worktree entry in a folder with the same name as the new branch. The full path to that branch will be inside a new folder, with a directory name taken from the original folder, appended with the term .worktrees.
For example, let’s say you’re creating a worktree entry and want to create a new branch named demo-worktrees-branch based on the dev branch, which you had selected in a previous step. Let’s also say that while working in a directory called vscode-gitlens, you have selected the next highest directory to base the new worktree entry’s folder, ... In this scenario, your new worktree entry and branch would be at ../vscode-gitlens.worktrees/demo-worktrees-branch relative to your present working directory.

How do you use Git worktree add for an existing branch using a different name than the working directory with GitLens?
Up until now, you have named the target directory using the same name as the branch. While this is the most common, and least confusing way to name the directory, Git allows you to have a different name for the folder than the branch name.
If you select the third option from the Command Palette drop-down menu: Create Worktree (directly in folder) for branch <branch-name>, you will create a new worktree entry based on your specified branch inside the target folder.
For example, let’s say you’re creating a worktree entry from the insiders branch and want to have it live in a directory called vscode-gitlens-demo-1. Let’s also assume you have selected the next highest directory to base the new worktree entry’s folder, ... Your new worktree entry would be at ../vscode-gitlens-demo-1 relative to your present working directory.
Note: To use this option you must select an empty folder during the file section step, (step 2 in the process). If the folder is not empty you will see an error message the command will fail.

GitLens Worktrees will still show the name of the commit-ish in the worktree entry list, no matter what you name the folder, making it easy to keep track of which branch, tag, or commit-ish you have added.
How to use Git worktree add to create a new branch using a different name than the working directory with GitLens?
Choosing the fourth option from the Command Palette drop-down menu: Create a New Branch and Worktree (directly in folder) from branch <branch-name> will present you with a new option from the Command Palette to name the new branch. The new branch’s first commit will be the latest commit on the branch you specified in the previous step.

For example, let’s say you’re creating a worktree entry, and you start by creating a new branch named ‘feature-demo’ that you want to place in a directory called gitlens-feature-demo. Let’s also say that you’re working in a directory called vscode-gitlens and have selected the next highest directory to base the new worktree entry’s folder, ... In this scenario, your new worktree entry would be at ../gitlens-feature-demo, relative to your present working directory.
Note: To use this option, you must select an empty folder during the file section step, (step 2 in the process). If the folder is not empty, you will see an error message, and the command will fail.

Git Worktree List with GitLens
One of the best parts about the GitLens UI is that you never need to run a command to see the list of worktree entries, you just need to look at the Worktrees section of your Source Control menu.
Make visualizing worktrees, and the rest of Git, easier by powering up to GitLens+ Features right now!
Git Worktree Remove with GitLens
To remove a worktree entry with GitLens, just right mouse click, or alt-click, the worktree entry from the list and select the Delete Worktree… option.

After you’ve selected the Delete Worktree… option, GitLens will open the Confirm Delete Worktree menu from the Command Palette. You can choose to Delete Worktree or Force Delete Worktree. Force deleting a worktree will also delete any uncommitted changes.

How to Use Git Worktree List with the Command Line
If you’re using the Git CLI, you won’t have immediate visibility into your active Git worktree, so you will need to run the Git worktree list command to view a list of your worktree entries.git worktree list

The output details include:
- the path of each worktree entry
- the commit hash for the branch checked out for the worktree entry
- the name of the branch that is currently checked out for the worktree entry
How to Use Git Worktree Add with the Command Line
Just like adding a new worktree entry with GitLens, there are 4 possible scenarios to choose from when using Git worktree in the CLI. Let’s walk through each Git worktree example.
How do you use Git worktree add for an existing branch using the same name as the working directory with the command line?
git worktree add path/to/folder/<existing-branch-name>

How do you use Git worktree add for an existing branch using a different name than the working directory with the command line?
While this command looks very similar to the previous one, note the use of the space between the file path and the branch name.git worktree add path/to/folder/ <existing-branch-name>

How do you use Git worktree add to create a new branch using the same name as the working directory with the command line?
You can tell Git to create a new branch by using the -b flag. By default, it will create the new branch based on the branch you currently have checked out.
git worktree add -b <new-branch-name> path/to/folder/<new-branch-name>

You can also choose to base a new branch from another branch, tag or commit-ish, by specifying your choice at the end of the command.git worktree add -b <new-branch-name> path/to/folder/<new-branch-name> <existing-branch-to-use-as-base>

How to use Git worktree add to create a new branch using a different name than the working directory with the command line?
git worktree add -b <new-branch-name> path/to/folder/
How to Use Git Worktree Remove with the Command Line
To remove a Git worktree entry with the CLI, you will need to specify the folder you want to remove. If the branch name and the folder name are different, you don’t need to name the branch.git worktree remove path/to/folder/

If there are uncommitted changes in that working tree’s folder, the remove command will fail. To overcome this, you can use the force option: -f. As with any use of --force, be careful and make sure you know what you’re doing before overriding Git’s safety precautions.

Ready for an easier way to manage Git Worktrees?
Your time is valuable, not to mention your mental energy. Why spend them trying to remember or having to manually track existing worktree entries? Why run the Git worktree list command constantly? Let GitLens for VS Code organize all of that for you, and present it in a beautiful and easy-to-follow UI.
Manage worktrees with ease and unleash the full power of Git in VS Code with GitLens!